
 Twitter
 Instagram
 LinkedIn
 Github
 Strava
 Facebook
I just added alias :q="exit" to my .zshrc file, because I kept doing it.
English posts
Maybe I should start a Vim-log of things I encounter and find useful. Most of them seem too advanced for the beginner and too trivial for the expert, but who's really an expert at Vim, aren't we all beginners for some part of it?
So, today I learned about the :cd command, which I instantly memorized (for it's just Unix). It changes the home directory of Vim, (by default this is the folder you start Vim in).
For example, if you're at ~/code and you want to check the contents of some file in my Seblog-project, I would do vim seblog/site/config/config.php. But as always, I need to check another file, so I use :e (short for :edit) to open that file, but because I was in ~/code when I opened Vim, I need to type: :e seblog/site/config/other-file.php. I find that annoying, so I would close Vim altogether, cd seblog and then vim ..
Now, I would just :cd seblog and then :e site/config/other-file.php. Or use :Ex (for :Explore) if I wanted to look around, but I knew that one already.
Thinking about bookmarks and likes on the IndieWeb
At Virtual HWC last week, Sven Knebel pointed me to the new Firefox beta. I use it now, and one of the things I noticed is that ships with integration with Pocket, a bookmarking service to save articles you want to read later. It’s owned by Mozilla now, so they accentuate their service by adding a button prominently in your address bar.
Despite the pushiness, I tested it out a bit. I like that I can save articles with one click, so I can read them later, possibly on a different device. It made me think about the way I post bookmarks on my own site.
My bookmarks and likes look too similar
The way I have implemented bookmarks at this moment, is very, very similar to the way I implemented likes. It is a Microformats property (u-bookmark-of vs u-like-of), displayed as an icon (a grey bookmark vs a red heart), with a Dutch text (‘Seb heeft [dit] gebookmarkt.’ vs ‘Seb vindt [dit] leuk.’).
By making bookmarks and likes this similar, one would almost think that there is a clearly defined difference in the words ‘bookmark’ and ‘like’, that keep them apart, since there is no other distinction. I don’t think there is such a definition.
Bookmarks are mostly used as a ‘want to read’-list, or a way of keeping track of things that have been read, but might be of interest on a later moment (‘want to read again’). Likes are more a reply of some sorts, directed at the author of the post, expressing appreciation.
The problem comes when I take readers of my blog into account. The things I like, might be read as a recommendation, but the things I bookmark, might also read as a recommendation. Once I start looking from that perspective, likes and bookmarks fulfill the same role again.
When likes and bookmarks are not recommendations
Sometimes I like things on social media, not because of the contents of the post, but because of the social context around the post. I do not really like the bad picture of the malformed pizza of a friend, I like the fact that I recognize that pizza as the outcome of the enthusiastic plans about making a pizza that my friend told me about earlier that day. I sometimes don’t like the specific check-in a person posted, I just like the person. Some tweets are also quite ambigu: do I like the tweet because of the tweet, or because of the linked article I might or might not have read?
Those likes are not recommendations for readers, they are purely appreciation, or even just social acknowledgement. Within a certain social context they can be of value to other people, but to random strangers, they are not. Currently, I solve this problem by not posting those kinds of likes to my site at all (leaving them on Facebook or whatever silo), but that’s of course not ideal in the IndieWeb scheme of things.
With bookmarks, a similar thing can happen: not all bookmarks are recommendations. The easiest example is an article that I think looks interesting, so I bookmark it to read it later, but I haven’t read it yet. I do not recommend that article, but a reader might think that.
In both cases: sometimes I do want to recommend an article in a single post.
What I don’t want to propose
Let me make a little pause here and say something about likes, favorites, recommendations and what more. We can solve the above things by just adding more webactions to the field. “Let’s also support, next to bookmarks and likes, favorites and recommendations.” But I don’t think that’s the solution, because adding those options means just more post types to keep track of, for both publishing sites and consuming indie-readers.
Keeping things a little bit abstract and minimal helps us focus on the problem at hand. (Which is at this moment, I think, building an functioning indie-reader in the first place.)
What I would add to my bookmarks
Seeing what Pocket does with bookmarks, I think I want to expand what I post as a bookmark. To be fair: a lot of other people on the IndieWeb have more detailed bookmarks too. Other properties of a bookmark include: tags, a little summary of the bookmarked post, the reason why the post was bookmarked and sometimes even a screenshot of the bookmarked page.
I’m not sure how much I want to add to them, but since they are very skinny now, I certainly would like to add some tags. Tags, and possible a reason, make it easier to find a bookmarked article back after a while.
That brings me to what I think a bookmark would be for me: showing an interest in the linked article, without adding too much judgement. I see bookmarks as a personal archive of things I want to read or have read. If technical skills allow it, I would also save a copy of the post for personal use, hidden in the bookmark-post itself.
What I would change to likes
To likes I wouldn’t change much. For likes, I want to make a personal copy of the original too, because I do care about that content, but from the outside, it’s just a link.
But the value of the like would than be more of a vote: this is a piece of content I care about. I think indie-readers should also consume those likes, but just don’t display them the way they display a photo or a note. If there is a post by an author that I don’t follow, but that is liked by, say, three people I do follow, then I want to see that post, accompanied by the names of the three people who liked it.
The threshold for the external posts to show up may vary from person to person, both personal preferences of the reader as well as the status of the poster of the like. But the point is that it’s a indie-reader-problem.
In this way, a like is in fact a recommendation, from the readers perspective, but just appreciation from the poster.
But back to these social likes
Then there are still those likes that depend on some social context, that aren’t solved by the above approaches.
I think that the root of the problem lies in those exact words: social context. If I like a certain badly photographed pizza, I should not post that to my main feed, but set the visibility of that like to ‘friends only’. Chances are that the badly photographed pizza was already published as a private post, only visible to a certain audience, so I can copy that.
The problem here lies more in an easy way of publishing private posts, and an easy way to change the audience of those posts. And of course a way for sites to securely share those posts with the right indie-readers, there is a long way to go still.
And what about the bookmarks you haven’t read?
Sharing unread bookmarks is also, I think, question of adding the right audience to the post. Such bookmarks can be posted with an ‘only me’ visibility. You can then subscribe your indie-reader to your own (private and public) bookmarks-feed. This is, without the private part, what I actually did for a while when I was using an indie-reader. Apart from the bugs in my self-build reader, it worked very well.
And really recommending something? Well, if I really want to recommend something to people who follow me, I can always just post a note, linking the article, and explain why they should read it. That also improves the chance of actually clicking through, no need for extra formatting.
Conclusion
In the end I don’t think we need better boundaries between a bookmark and a like, in the form of extra ‘recommend’ or ‘favorite’ webactions. A bookmark adds something to an archive for yourself, and a like is giving appreciation to the creator of the post. Recommendations can be either explicit by posting a note, or implicit by publicly liking or bookmarking. But, the way this is implied should be the responsibility of your indie-reader, where you can mix to your own taste. Publishers could filter things that they don’t want everybody to pick up as recommendations by using ‘only friends’, ‘only who I follow’ or ‘only me’ posts.
In the end of the day, this is a lot of thinking and talking. I should get back to creating a indie-reader. As should you, because that’s where the one of the undefined parts of the IndieWeb lies now.
Adding Micropub to your IRC bot
In last weeks IndieWeb newsletter I read a blogpost by Sven about having notifications for webmentions and such via IRC. He described more or less the setup I have too: using Aaron’s TikTokBot framework, running on the same machine as a private IRC server for it and your IRC bouncer. In my case, the machine is a Raspberry Pi in my living room, but Sven’s guide describes more or less what I did too, so please check that out.
I divided my webmention notifications into webmentions and silomentions (that’s backfeed from services like Bridgy and OwnYourSwarm) and I also get notifications for logins and Micropub requests, so I can keep track of what’s happening on my blog. But that’s just expanding the notifications. I added some other functionality I wanted to talk about.
Hey bot, please like this post
The one thing that made me post on my site the most, was adding Micropub support. There are various Micropub clients out there that you can use to just write a blogpost, to post a like, to import checkins from Swarm or what have you. But since it’s so simple (once you know how), I also made a lot of Micropub clients out of Workflow, Paw or, in this case, my IRC bot called Bop.
I can now say like https://example.com/a-post in the same channel my notifications come in, and Bop will post a like-post on my site. My site will then post the webmention and if the other site accepts it, it will be shown as a like under the post, just like that.
Please refer to Sven’s blogpost to learn how to set the bot up. I also assume you already have a site that supports Micropub. I will go into obtaining an access token a bit, but that might be a tricky part and depends on how your Micropub endpoint works.
Getting your bot hooked
Sven mentions the file ‘hooks.yml’, which contains hooks: [] for him. The hooks-file defines the things the bot will respond to, and since Sven only want to receive notifications, not talk to his bot, he does not need hooks. But we do. Replace the contents of the hooks file with the following:
hooks:
- match: "^(like|bookmark|rsvp|yes|no|maybe|interested) (https?\\:\\/\\/[a-zA-Z0-9\\-\\.]+\\.[a-zA-Z]{2,}(\\/[^>,\\\")\\s]*)?)"
  url: "http://localhost:8000/micropub.php"
  channels:
  - "@seblog"
- match: "^(tweet|note|fb) (.*)"
  url: "http://localhost:8000/micropub.php"
  channels:
  - "@seblog"
As you can see, I like to match for a URL to support like, bookmark and rsvp, and for anything to support notes on your own site, Twitter and Facebook. Feel free to change the syntax to your own needs.
Under channels, I defined @seblog, which means ‘every channel in the server seblog’. That name comes from your config.yml, and it’s a safety measure, so that when I connect my bot to Freenode also, it won’t accept likes from other people. I am the only person connected to the private IRC network Seblog, so that will be fine.
Creating the Micropub.php
As you saw, the hooks define a URL that will be called by the bot. I specified that to be on localhost:8000 and point to micropub.php. In your TikTokBot folder (or where you want, really) create a folder called ‘server’ and a file within it called ‘micropub.php’. Let’s start with the following to test it out:
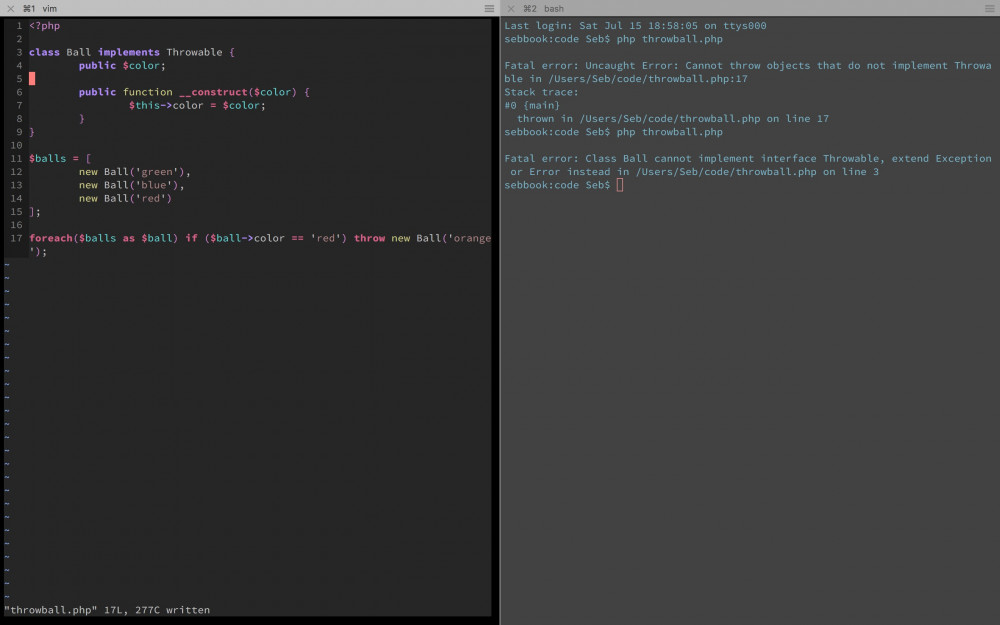
<?php
header('Content-Type: application/json');

echo json_encode([
  'content' => 'Hi, you called for a Micropub?'
]);
Then go to the newly created folder and run the command php -S localhost:8000. This starts up a webserver from that folder, so if you now go to your private channel and say note This is a test, you will see that the bot responds. If you say something that does not match the regex, the bot will stay silent.
Give me my data back
If we want to send data to our Micropub endpoint, we need to make sure that our bot has that data. Let’s make the bot echo whatever we said, so we know that he heard us.
TikTokBot gives us a JSON object of the message via the POST data. Long story short, you can get it by using the following:
<?php
header('Content-Type: application/json');

$message = json_decode(file_get_contents("php://input"));

$full   = $message->content;
$action = $message->match[0];
$param  = $message->match[1];

echo json_encode([
  'content' => "Hi, you said '$full', you wanted to $action $param?"
]);
Now, if you say like https://seblog.nl/2017/08/19/6/micropub-irc-bot, the bot will respond with Hi, you said 'like https://seblog.nl/2017/08/19/6/micropub-irc-bot', you wanted to like https://seblog.nl/2017/08/19/6/micropub-irc-bot?. Try it out, and different actions too, so you know it works!
Make sure not to echo the full message, because since the bot listens to itself, that message will trigger itself again, resulting in the bot repeating the message over and over again. (Just restart the bot if that happens.)
Sending a POST request
A Micropub request is, in the end, just a POST request. Here’s a little helper function to send one for you. Just start with this code at the top of your file, right after <?php.
function send_post($url, $fields, $bearer = null) {
  $ch = curl_init();
  curl_setopt($ch, CURLOPT_URL, $url);
  curl_setopt($ch, CURLOPT_CUSTOMREQUEST, 'POST');
  curl_setopt($ch, CURLOPT_RETURNTRANSFER, 1);

  if ($bearer) {
    curl_setopt($ch, CURLOPT_HTTPHEADER, ['Authorization: Bearer '.$bearer]);
  }

  $body = http_build_query($fields);
  curl_setopt($ch, CURLOPT_POST, 1);
  curl_setopt($ch, CURLOPT_POSTFIELDS, $body);

  $resp = curl_exec($ch);

  if(!$resp) {
    $resp = 'Error: '.curl_error($ch);
  }

  curl_close($ch);

  return $resp;
}
Next, I have a plain and dirty if-chain, to determine the action. You can add this right after you defined $action and $param:
if ($action == 'like') {
  $fields = [
    'like-of' => $param
  ];

} elseif ($action == 'bookmark') {
  $fields = [
    'bookmark-of' => $param
  ];
} else exit();

send_post('https://seblog.nl/micropub', $fields, 'xxx');
Make sure to replace that URL with your own Micropub endpoint, and xxx with your own access token. I’ll talk about obtaining one at the bottom of this post.
I don’t have the bot say anything after this, because the bot will give a notification once a Micropub request is made, which is enough feedback for me. You could also return whatever send_post() returns, I leave that up to you.
More post types
As you can see in the code above, you can just add fields to the array. Here are some other elseifs I use.
} elseif ($action == 'tweet') {
  if (strlen($param) > 140) {
    exit(json_encode(['content' => 'Text is '.strlen($param).' chars!']);
  }

  $fields = [
    'content' => $param,
    'syndicate-to' => 'https://brid.gy/publish/twitter'
  ];

} elseif ($action == 'fb') {
  $fields = [
    'content' => $param,
    'syndicate-to' => 'https://brid.gy/publish/facebook'
  ];

} elseif ($action == 'rsvp'
   or $action == 'yes'
   or $action == 'no'
   or $action == 'maybe'
   or $action == 'interested') {

  $fields = [
    'in-reply-to' => $param,
    'rsvp' => $action == 'rsvp' ? 'yes' : $action,
  ];

  if (strpos($param, 'facebook.com')) {
    $fields['syndicate-to'] = 'https://brid.gy/publish/facebook';
  }

} elseif ($action == 'note') {

  $fields = [
    'content' => $param
  ];
See how easy that is? Please make up new ones and tell me about it!
I’m particularly proud of the tweet one, which will, thanks to the exit(), not post the tweet unless it fits the 140-chars-rule.
Please note that the use of the syndicate-to fields (or the newer mp-syndicate-to) depend on your own website. This only gives my webserver the order to syndicate, it does not syndicate by itself. If your server does not know how to syndicate to Twitter, it will not work, but explaining how to do that is it’s own tutorial.
In real life, I actually have note set to 'private' => true and 'audience' => 'http://seblog.nl/, so it’s a private note. But: 1) I don’t expect many people to support private posts, 2) how many people are interested in posting things to their website only they themselves can see? and 3) I want to change the 'private' => true to 'visibility' => 'private', or something like that.
That’s it!
There you go, a customisable Micropub chatbot. Please double check that it’s only doing it’s thing on your private IRC server, and not on any public servers where your bot might lurk (if you use any). Have fun liking and posting!
POST-scriptum: Obtaining an access token
The question “what do I replace ‘xxx’ with?” is a hard one to answer, because it totally depends on how your site handles access tokens. Most Micropub clients ship with an IndieAuth flow to obtaining one, but since we’re making this one ourselves, we have to get one manually.
You can do this by following the steps on the wiki, if you have a way to send POST requests. You can also log in to a Micropub client like Quill, which shows you the access token it got, and use that. Since this all depends on your own site, it might offer an easier way, or it might not.
Update 2017-10-04: In an earlier version of this post, I did not set a Content-Type: application/json-header, so the bot didn't actually respond. Setting that header at the top of your file will fix that.
Queue for Kirby
I was in need for a Queue, so I made one. :)
This plugin adds a basic queue to the Kirby CMS, using Cron and Kirby's flat file system.
It's mostly designed to be used in other plugins, such as the new Webmentions plugin I'm writing.
Github: https://github.com/sebsel/queue-for-kirby
queue::define('job_name', function($job) {
    $job->get('param');
    // contains 'some data' in the job added below
});

queue::add('job_name', [
    'param' => 'some data'
]);
Sad.
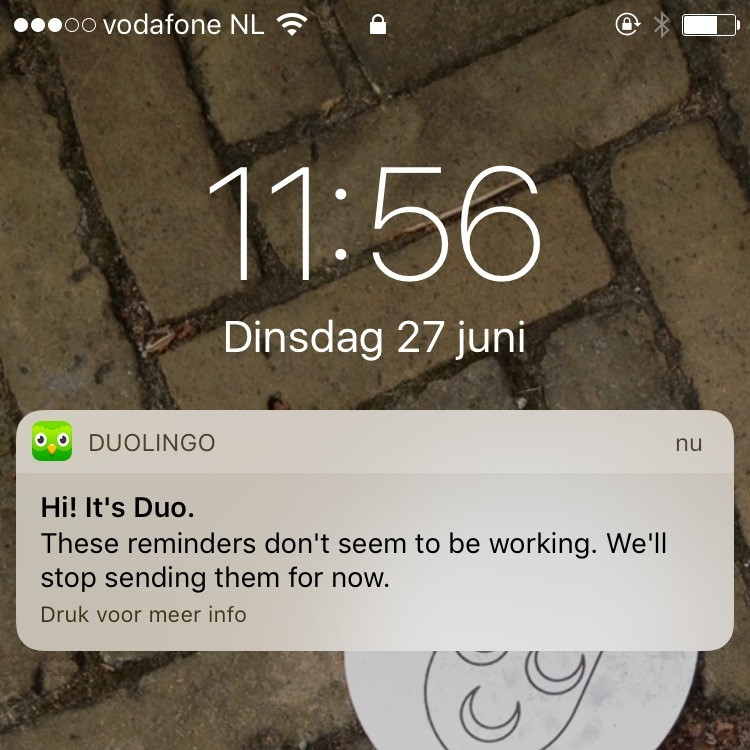
Okay, @duolingo and I already are at this stage of the relationship.
Switching to ZNC on my Raspberry Pi
I’ve been following the #indieweb channel on IRC for a while now, sometimes more active than other times, and my several methods. In the beginning, I just read the logs on chat.indieweb.org, but when I wanted to say something I had to login with Textual.
Back in Amsterdam I had a bad internet connection (they probably tried to block IRC) so I wasn’t using it a lot. Then there was the bridged Slack channel, which I used intil my first HWC, where Martijn introduced me to thelounge. I installed it on a Raspberry Pi I had lying around and used that for quite a while, until I became inactive and shut the thing down.
Unfortunately I haven’t been able to make it work again after that, so I was in need of something else. Meanwhile I got used to Textual again, and I kind of liked that, except that it disconnected every time my laptop went to sleep.
Ok, so, ZNC you said?
Yeah, enough history! Let’s get to it. ZNC is an IRC bouncer, which connects to IRC for you. When you connect to ZNC, ZNC will give you all the messages it received since you where away. So accedentally closing your laptop? No worries, just open it and you receive all messages again.
You still need some computer to be online all the time, but I had that same Raspberry Pi (first edition model B), and it’s perfect for this job.
I first followed the installation instructions here, first downloading the latest source tarball, and following the unpacking and configuring described on that page. Later on, I had to use a different flag on configure, so I added that one here for you. I used the following commands in order:
wget https://znc.in/releases/znc-1.6.5.tar.gz
tar -xzvf znc-1.6.5.tar.gz
cd znc-1.6.5
./configure --enable-python
make
sudo make install
This all takes a while, especially the make part.
I then made sure I opened a port on my router towards my RPi, so I could access it from outside my home-network, when I’m on the go (look for the NAT settings in your router).
Extra modules
Then for extra modules. The webadmin was on, so I could just go to my home-IP + my new port, let’s say https://192.0.2.0:8000. I had SSL enabled and bad certificates, so you might need to trick your browser into accepting them. In the global modules, I enabled chansaver, lastseen and log. I also had notify_connect, but it felt too noisy for me. Don’t forget to hit the ‘save’ button.
In ‘Your Settings’ I have chansaver and controlpanel on, I believe by default.
For other module configuration I connected to ZNC using Textual. When you add it, you can give it a connection name (this is for yourself). The server address is your home IP, and the port the outside port you put in your router. The server password is the one you put in ZNC in the ./configure step. But then comes the part where I was puzzled: go from the ‘General’ to the ‘Identity’ view, and add your Freenode IRC nickname as ‘Nickname’, but your ZNC username as Username. I used sebsel@Mac/freenode, to identify it later. The personal password is for the NickServ password on Freenode.
After connecting I did /msg *simple_away SetTimer 0, because I want to be set to away the moment all my devices are disconnected from ZNC.
Because I want to have Textual on my Mac, and this new-found Mutter on my iPhone, I have to get ZNC to manage multiple clients. By default, ZNC sees you have read your messages on your iPhone, so it does not send it to your Mac. To keep track of multiple clients, you need the ClientBuffer module.
Since I still had the source, I could just compile the module. So I did:
cd ~/znc-1.6.5/modules/
wget https://github.com/jpnurmi/znc-clientbuffer/blob/master/clientbuffer.cpp
cd ~/znc-1.6.5/
make
sudo make install
After that, I got back to Textual, and did /msg *status LoadMod clientbuffer. After that, you can /msg *clientbuffer help and send *clientbuffer some commands as messages. I did AddClient Mac and AddClient iPhone. You can do a ListClients too to see what you got.
Adding Mutter to the game
On the iPhone app Mutter, I added a network with again my home IP as the server, my nickname sebsel and under Advanced use the port I opened, added the password of ZNC in the first password field. The ‘username’ under Advanced gets the username for ZNC, so I made it sebsel@iPhone/freenode, to let Clientbuffer identify it as my iPhone. If you have notify_connect on you will see that *status notifies you about logging in with your iPhone.
Warning: I didn’t get this next part to work
Next I saw that there is an option to receive notifications from ZNC to your iPhone via Mutter. You will need their mutter-push module for that, and that requires ModPython, so that’s why I added the flag --enable-python during the first make.
As their explanation says, first grab the mutter package, then make sure you got the right python libs, and then move mutter.py to ~/.znc/modules/.
cd ~
wget https://bitbucket.org/jmclough/mutter-push/get/master.zip
unzip -d mutter -j master.zip
cd mutter
sudo apt-get install python3-pip
sudo pip3 install requests
cp mutter.py ~/.znc/modules/
In IRC, make sure to /znc loadmod modpython and then /znc loadmod mutter (or send a message to *status with loadmod modpython etc.).
This last part of getting notifications is still not working for me. I still wanted to post this though, because all the other things work. Hope I’ll get back to notifications soon, when I do get them to work.
Daily and monthly overviews
This weekend I worked on some things on Seblog, and since I did some productive work on other projects today, I feel like I can write a blogpost about it without sounding so procrastinating.
Inspired by Aaron Parecki's monthly overviews, and triggered by @zegnat, who was looking for the same type of page on my site, I started to 'deconstruct' my URLs. You can now remove parts of it and still get useful pages. That was on my list of itches since november 2015 now.
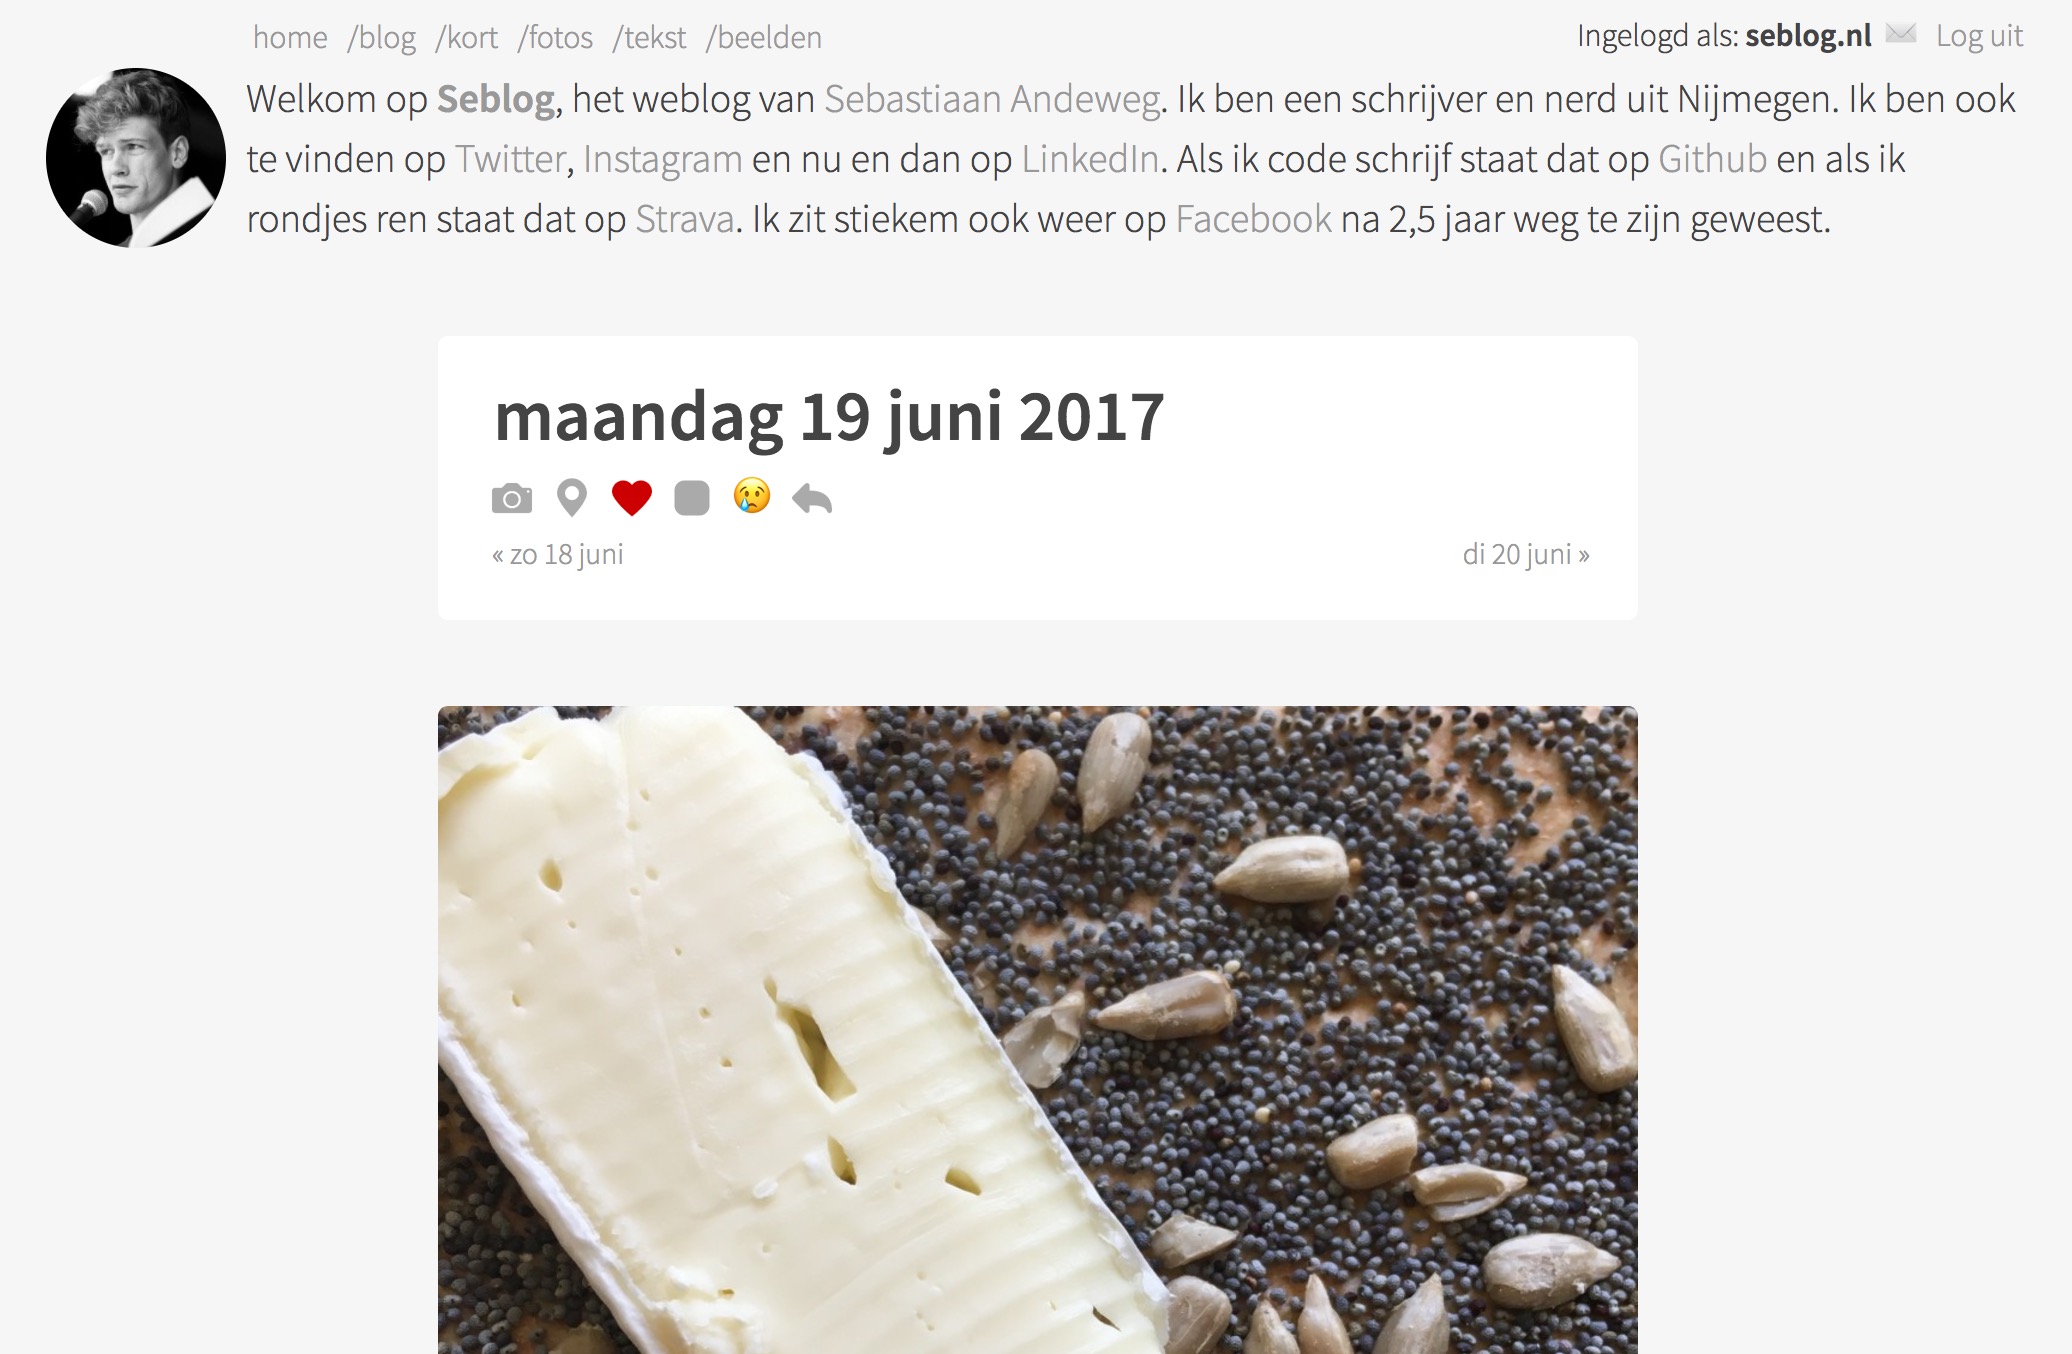
So let me explain my URL design first. This post, for example, is /2017/06/20/1/daily-and-monthly-overviews. This is an idea I got from the wiki, and probably also originates with Aaron. The identifying part of it is the date, followed by an ID (the nth post of that day). The slug is just for humans and can be omitted: you will get redirected to the right one. Some posts don't even have one. This allows for a Whistle-style URL shortener which I run at 5eb.nl. (This post can be found through 5eb.nl/4ox1.)
The first step was to remove the ID, to get to a day view. I just list all the posts that are created on that day, including private posts when I'm logged in, but oldest-first instead of the newest-first order of my feeds. I also display a summary of the day in icons at the top. I'm really pleased with how it turned out!
After that, I also wanted the monthly view, to get a better overview. I'm really pleased with that too, it's nice to go through my old posts this way, seeing old memories. I'm now more interested in importing my Facebook posts too. I am still looking for a way to have some anchor or summary of the day in my monthly view, to find posts quicker, and adding a location like Aaron might do the trick, but I'll have to figure out how to do that still :)
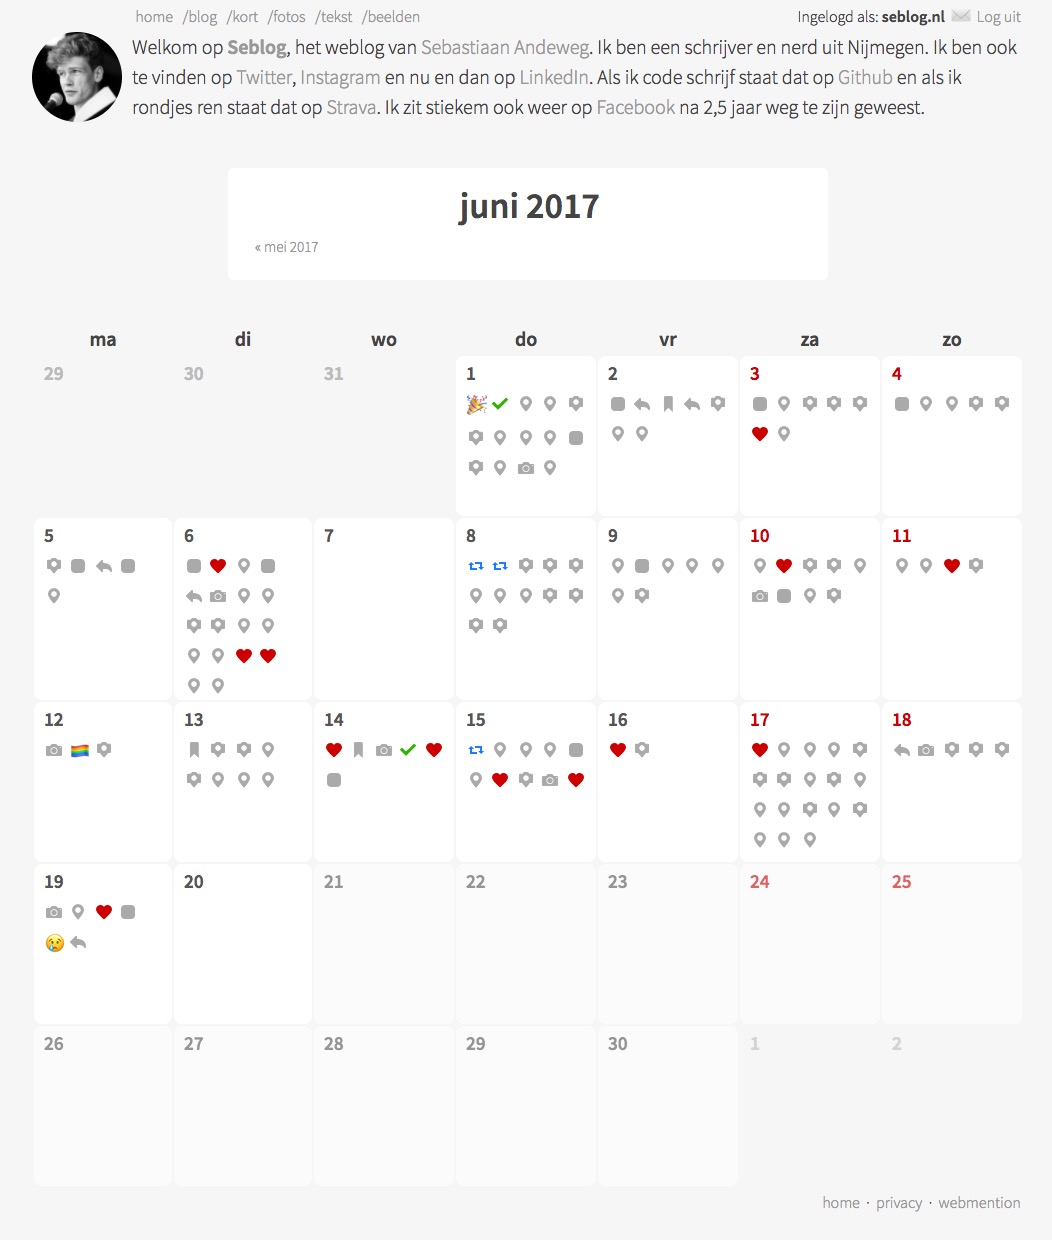
I'm quite happy with this for now!
@-mentioning people on my blog
The past week I mentioned both Martijn and the Twitter-account of the Dutch Railways (@ns_online) in different blogposts. For Martijn, I used a hand-written link with the proper .u-category.h-card classes to person-tag him. [see update below] For @NS_online, I wanted to @-mention them in the POSSE'd tweet. Martijn complained that my blog didn't autolink them, so that's what I fixed now.
I have a new syntax to @-mention (and thus tag) people in my blogposts.
- I want to match names like
@name - I don't want to match the word @-mention itself.
- I want to be able to escape the @-mention with a
\, like\@name, so I can talk about @-mentions in a blogposts (this one, actually, I like meta-meta-meta).
Then the syntax. Obviously I use an @-symbol, with a name behind it. I then check the name for the following:
- Is the name on my list of names? Then use the URL I provided.
- Does the name contain a dot? Then assume it's a domain / URL itself, so add replace
@withhttp://(@seblog.nlbecomes<a href="https://seblog.nl/">Sebastiaan Andeweg</a>) - And if it doesn't contain a dot, assume it's a Twitter account.
I then fetch the h-card (or profile information) from the resulting URL, and use the name that's there.
There are times, however, where I want to specify the name. In the example at the beginning of this post, I called Martijn 'Martijn', not 'Martijn van der Ven', which is on is h-card. Sometimes a full name makes no sense. So I can add the name I want to use in brackets behind the tag (@Zegnat[Martijn]). This way I have total control over my text (and possible conjugations if I start writing in a language that needs those, not that I speak one).
Then it all comes down to the following syntax:
@namefromcache        > the URL I specified
@someone.com          > that URL
@facebook.com/someone > also the literal URL
@twitteruser          > their Twitter profile URL
@someone[This Person] > my own name for them
\@someone             > escaped tag
I now need to redo my automated webmention-sending, for it does not yet recognise these tags. Manual sending works fine!
Edit: after some discussion during the Virtual HWC EU-time, I realised that just doing @someone is not really person-tagging them. Person tagging is explicitly saying "I am now with this person", which makes sense for photos and checkins, but not always in blogposts.
I added a minor tweak: I can now use + instead of @ to really person-tag someone. The @ is used for just a mention, the +-mention will receive the class="u-category h-card" markup. I don't know how much I will be using that, but I have that option now.
als antwoord op
Hi! I saw your like and your re-webmention (because the picture is broken). I think I should've found the right author using all the steps on /authorship – XRay does find it and I'm thinking about switching to using that for my mentions.
What I did see on your side, however, is that you have a p-author outside of any h-*.
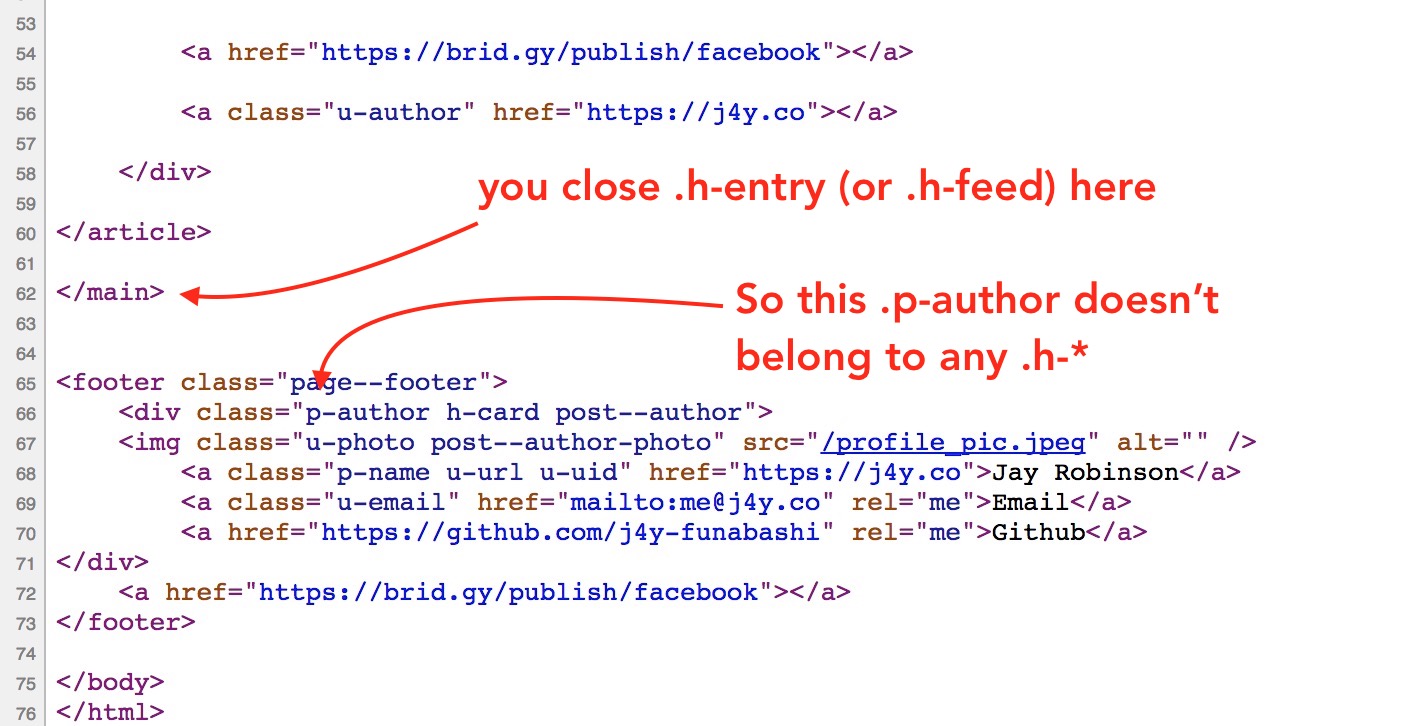
I think my site would've found your h-card if it was the first thing on your homepage, or if you would've extended your h-entry to include that p-author h-card. But that only makes your site easier to parse, I should've found it with this already :)
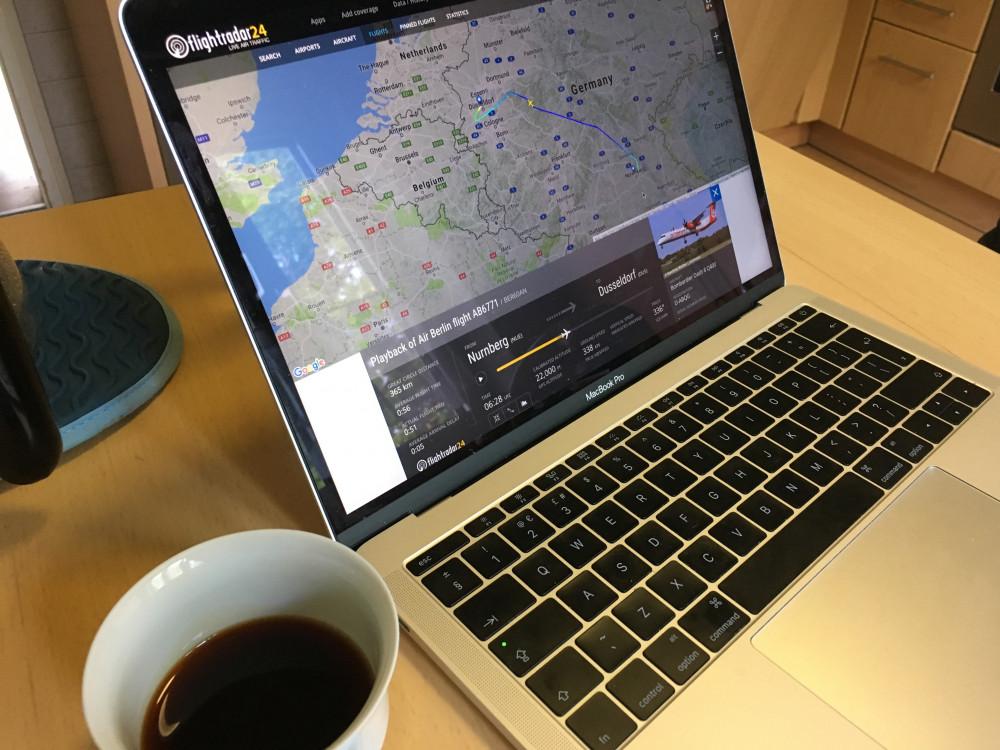
Comparing Aaron Parecki's flight on his website to the one on Flight24, during breakfast with @calum_ryan #indieweb #returninghome
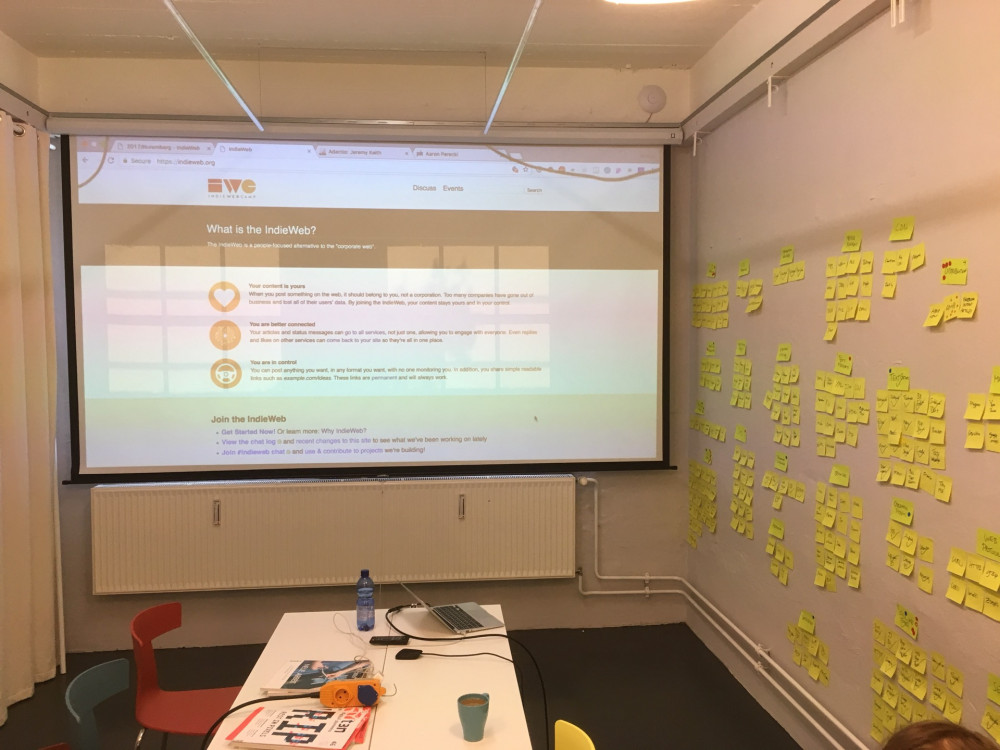
I'm at #indiewebcamp Nuremberg! Demoing Micropub :)
I later demo'ed the update query with external pictures. This picture is made by Aaron Parecki.
The number of slices of German bread and the number of slices of Junger Gouda mild-würzig are off by one. Tomorrow will be a sad day.
The #indiewebtrain ready for heading towards Nuremberg. @indiewebcamp, @nueww — here we come! \o/

als antwoord op
Ooops, thanks for letting me know! I got LetsEncrypt's "autorenew" option on now, hope that works :)
At one point yesterday, I understood the difference between IndieAuth, IndieAuth and IndieAuth. I believe I reached that point again, almost.
Day 45: receiving reacji
A little while ago I added reacji to my site. Since reacji are just comments who's content contains only one emoji, I did support reacji before the change. I only changed the way I displayed them, when I send them.
One thing I noticed after my return to Facebook, is that the like-button now has several nuances. These love, haha, wow, sad, angry-things are sent by Brid.gy as emoji. Because of this, it didn't took long for me to receive my first reacji via webmention. They just showed up as comments with one emoji.
So today I fixed that:
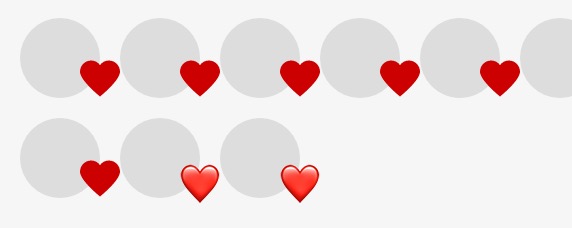
Note that I already used a heart icon for likes. I want to keep it that way, the emoji looks different enough to distinguish them. If you comment on Facebook with a heart, they display it as a comment with a heart, and I will just show it as a like, like above. But I'm fine with that. You can also reply with other emoji if you like.
Oh, and I fixed the images now too.
Every social network has its own dynamics, and when you leave for a couple of years, you need to take the time to familiarise yourself with the tone of communication again. At least, that is what I tell myself when I'm spending hours and hours on end scrolling through Facebook.
Day 44: hooking up Brid.gy
Yesterday I re-activated my Facebook, for the first time since 2.5 years. Still not really sure about this silo-return, but I want to try it again. Facebook is a powerful tool, and with the other tools IndieWeb gave me, I think I can manage my relation to it better than I could 2.5 years ago.
At first sight, it might look as if IndieWeb is about stopping silo's. In that light, a return looks strange. But there is no IndieWeb principle that says you should quit Facebook or Twitter. As long as I POSSE, I own my data, and I can still connect to my silofriends.
I still want to minimise the actual time spent I on their site. So today I made the first few bridges that should make that happen: I hooked up by site to brid.gy/publish and the 'normal' Brid.gy backfeed for Facebook. Now I can post via Micropub to my site and automatically post to Facebook too. Any comments and likes received on the post on Facebook will return to my site as well.
Now I have to make some interesting content to test all this with.
Also just realised I have no-one to talk to about this. It feels so lonely, being connected again, because nobody shares that 'again' aspect of it. Everyone I know is on Facebook, or I think they are, and I don't want them to happily poke my newly activated account. I want to see what Facebook does with my account. Will it try to bring old posts under the attention of friends, to give me likes and comments, so I stay? Or will it be unnoticed?
Now I have to go to a real-life event. I will try and resist telling people about my Facebook adventure. (That's why live blogging about it in English seems a good idea. I think this will be unnoticed as well.) The nice thing is: I can just post an RSVP to a Facebook event via my site. Will hook up Brid.gy tomorrow, if I still think Facebook is a good idea then.